Dirt Cake. Just the name brings a smile, doesn’t it? This isn’t your average fancy dessert, but trust me, it’s a guaranteed hit, especially if you’re making treats for kids, or just want a fun, easy dessert that brings out the kid in everyone. Imagine layers of crumbly chocolate “dirt,” smooth, creamy pudding, and those wiggly gummy worms peeking through. It’s playful, it’s delicious, and it’s incredibly simple to make – even a 7-year-old could help!

Table of contents
What is Dirt Cake? A Sweetly Simple Sensation
The History and Charm of This Classic Dessert
Dirt Cake, also sometimes called Dirt Pudding Cake or Graveyard Pudding around Halloween, is a no-bake dessert designed to look like, well, dirt! It became popular in the United States, especially for children’s parties, sometime in the late 20th century. The charm is in its playful presentation. It’s supposed to be a bit silly and unexpected – who wouldn’t giggle at eating ‘dirt’ that tastes this good?
Why Dirt Cake is Perfect for Kids and Parties
Kids are naturally drawn to anything a little bit messy and fun, and Dirt Cake totally delivers. It’s interactive – they can help crush the cookies, layer the pudding, and of course, arrange the gummy worms. Plus, it’s visually exciting. Forget fancy frosting, this dessert is all about looking wonderfully ‘dirty’ and delicious. It’s become a staple at birthday parties, school events, and any gathering where you want to bring a smile to everyone’s face.
Why You’ll Absolutely Love This Dirt Cake Recipe
Quick, No-Bake, and Incredibly Easy to Make
Let’s be honest, sometimes you need a dessert, fast. This dirt cake recipe is your answer. No oven needed! It’s all about layering and chilling. From start to finish, you can have this dirt cake recipe ready to go in under 30 minutes, not counting chilling time. Perfect for those moments when you need a last-minute treat.
Crowd-Pleasing Flavor That Everyone Enjoys
Who can resist the combination of chocolate cookies and creamy pudding? The base of this dirt cake recipe is crushed Oreo cookies, which everyone loves. Then, you have layers of rich pudding and a touch of cream cheese for extra tang and creaminess. It’s a flavor combination that’s familiar, comforting, and just plain delicious.
Perfect for Any Celebration, From Birthdays to Potlucks
Whether it’s a kid’s birthday bash, a casual potluck, or even a fun Halloween dessert, dirt cake recipe fits right in. It’s easy to transport, can be made ahead of time, and always gets a reaction. I’ve made this for countless school events and family get-togethers, and it’s always the first to disappear. It’s more than just dessert; it’s a fun centerpiece!
Get Your Hands Dirty: Ingredients for the Best Dirt Cake
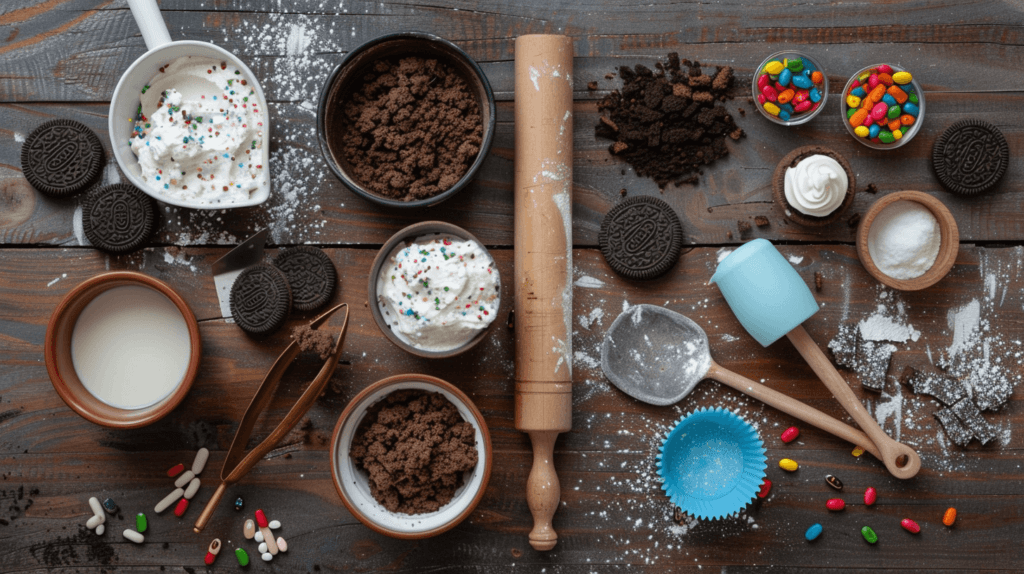
For the “Dirt” Layer: The Crumbly Oreo Base
Essential Oreo Cookies for Authentic “Dirt”
The “dirt” in dirt cake recipe comes from chocolate sandwich cookies, and Oreos are the classic choice. You’ll need a whole package of them. Don’t remove the cream filling – it adds to the texture and flavor. We’re going to crush these up to resemble garden soil. Trust me, it works perfectly!
For the Creamy Pudding Layers: Vanilla and Chocolate Delight
Instant Pudding Mixes: Your Shortcut to Creamy Layers
This recipe uses instant pudding mixes to keep things super simple. We’re using both vanilla and chocolate for that classic layered look and flavor. Make sure it’s instant pudding mix, not cook-and-serve. You’ll find it in the baking aisle of your grocery store.
Cream Cheese and Cool Whip: Adding Richness and Texture
To make the pudding layers extra creamy and a bit more sophisticated (even in dirt!), we’re adding cream cheese and whipped topping, like Cool Whip. The cream cheese adds a slight tang that balances the sweetness, and the whipped topping makes it light and airy. If you are looking for a substitution for Cool Whip, you can check out other whipped toppings, but Cool Whip is a classic for this recipe for a reason.
For Decoration: Worms, Rocks, and More!
Gummy Worms: The Classic Crawly Critters
Gummy worms are non-negotiable for this recipe! They are the quintessential decoration, making it look like real dirt with worms crawling out. Get the wiggly kind!
Chocolate Rocks and Sprinkles: Extra Edible Soil Decor
To enhance the ‘dirt’ effect, consider adding chocolate rocks or sprinkles. These are optional, but they really elevate the look and make it even more fun. You can find chocolate rocks at most craft stores or online, and sprinkles add a pop of color if you want a slightly less ‘earthy’ look.
How to Make Dirt Cake: Step-by-Step to Dessert Success
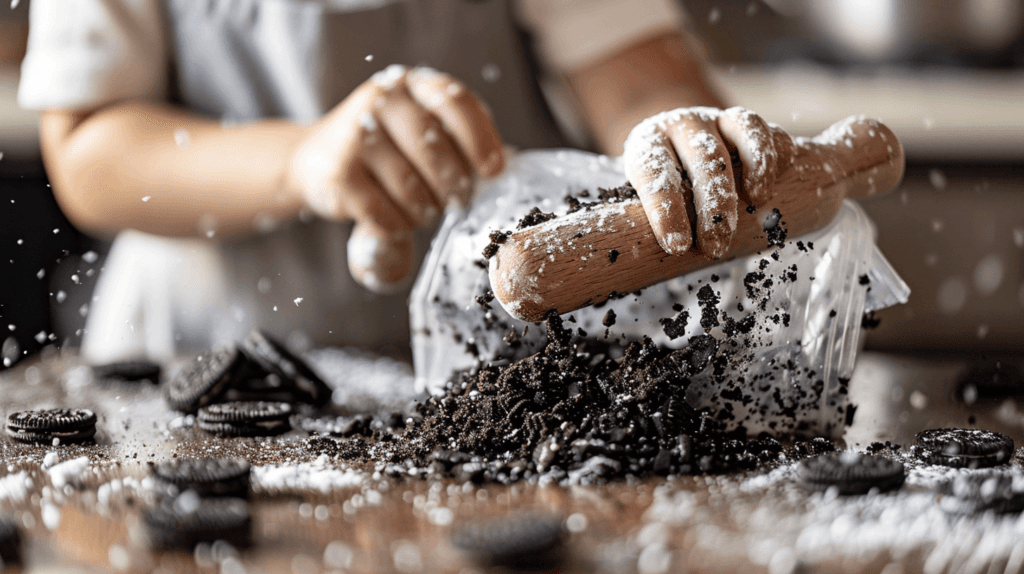
Step 1: Crush the Oreos – Creating the “Dirt” Foundation
The first step in this dirt cake recipe is to turn those Oreos into “dirt.” The easiest way to do this is to put them in a food processor and pulse until you have fine crumbs. If you don’t have a food processor, no problem! Place the Oreos in a large zip-top bag, seal it, and then use a rolling pin or even the bottom of a heavy pan to crush them into crumbs. Don’t worry if there are some bigger pieces – it adds to the ‘natural’ look of dirt. Set aside about 1 cup of the crumbs for topping later.
Step 2: Mix the Pudding Layers – Building the Creamy Center
Now for the creamy layers of this dirt cake recipe. In a large bowl, beat together the softened cream cheese and powdered sugar until smooth. Gradually whisk in the milk until it’s well combined. Divide this mixture in half. In one half, whisk in the vanilla pudding mix until it starts to thicken. In the other half, whisk in the chocolate pudding mix. Let both pudding mixtures sit for a few minutes to fully thicken up. Gently fold half of the whipped topping into each pudding mixture, keeping them separate. This will make them light and airy.
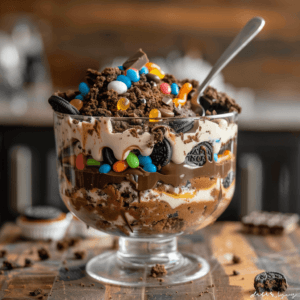
Step 3: Layer it Up! Assembling Your Dirt Cake Masterpiece
Time to assemble your dirt cake recipe! In a clear glass bowl or trifle dish, start with a layer of the Oreo crumbs. Press it down lightly to create a base. Next, gently spread the vanilla pudding mixture evenly over the Oreo layer. Top with another layer of Oreo crumbs, then spread the chocolate pudding mixture over that. Finally, add a last layer of the remaining Oreo crumbs on top.
Step 4: Chill Out and Decorate – The Finishing Touches
Now for the hardest part of this dirt cake recipe: waiting! Cover your dirt cake recipe and refrigerate it for at least 4 hours, or even better, overnight. This chilling time allows the layers to set and the flavors to meld together beautifully. Just before serving, decorate the top with gummy worms and chocolate rocks. Get creative! You can even stick some gummy worms halfway into the ‘dirt’ to look like they are emerging.
Expert Tips for Digging into the Perfect Dirt Cake
Getting the Right “Dirt” Texture: Crushing Oreos Like a Pro
For the most authentic “dirt” look in your dirt cake recipe, aim for a mix of fine and slightly coarser Oreo crumbs. Don’t over-process them into powder. A little bit of texture makes it look more realistic. And remember to save that cup of crumbs for the very top – it makes a big difference in presentation.
Layering Techniques: Ensuring Each Bite is Perfect
When layering your dirt cake recipe, be gentle when spreading the pudding over the Oreo crumbs. You don’t want to mix them together too much. Use the back of a spoon or an offset spatula to carefully spread each layer evenly. This will give you those beautiful, distinct layers when you serve it.
Tips for Working with Pudding and Cool Whip
Make sure your cream cheese is softened before you start mixing. This will prevent lumps in your pudding layers. When you fold in the whipped topping, do it gently. You want to keep the pudding light and airy, not deflate it. Fold until just combined. If you overmix, you’ll lose that lovely airy texture.
Delicious Dirt Cake Variations and Fun Ingredient Swaps

Chocolate Lover’s Dream: Double Chocolate Dirt Cake
Want to amp up the chocolate in your dirt cake recipe? Use chocolate pudding mix instead of vanilla. You can even use chocolate Oreos for extra chocolate intensity. Consider adding chocolate shavings or mini chocolate chips as decorations instead of, or in addition to, the chocolate rocks.
Healthierish Dirt Cake: Lighter Swaps and Alternatives
If you want to make a slightly lighter version of dirt cake recipe, you can use reduced-fat cream cheese and sugar-free pudding mixes. For a less processed topping than whipped topping, try making your own lightly sweetened whipped cream. While Oreos aren’t exactly healthy, you can look for a ‘thin’ version or even use graham crackers for a less intensely sweet base.
Seasonal Twists: Adapting Dirt Cake for Any Time of Year
Dirt cake recipe can be adapted for different seasons! For fall, mix in some pumpkin spice into the vanilla pudding and use candy pumpkins for decoration. For spring, add a layer of crushed-up Cadbury mini eggs and pastel sprinkles. For summer, try adding a layer of fresh berries between the pudding layers and decorate with colorful fruit candies.
Make-Ahead Magic and Storage Solutions for Dirt Cake
How to Make Dirt Cake in Advance: Timing is Everything
One of the best things about dirt cake recipe is that it’s perfect for making ahead. In fact, it tastes even better after it’s been chilled overnight, as the flavors really meld together and the cookie crumbs soften slightly. You can assemble the whole cake up to 24 hours in advance. Just hold off on adding the gummy worms and decorations until just before serving, so they don’t get soggy.
Storing Leftover Dirt Cake: Keeping it Fresh and Delicious
Leftover dirt cake recipe should be stored in the refrigerator, covered tightly. It will keep for 3-4 days. The cookie crumbs will soften over time, so it’s best enjoyed within the first couple of days for the best texture. It’s generally not recommended to freeze dirt cake recipe as the pudding and whipped topping can change texture when thawed.
Frequently Asked Questions About Dirt Cake (FAQs)
Can I make Dirt Cake the day before?
Absolutely! In fact, making dirt cake recipe a day ahead is recommended. It gives the flavors time to blend, and the texture gets even better. Just decorate it right before serving.
What are good substitutions for Cool Whip in Dirt Cake?
If you’re not a fan of whipped topping, you can use homemade whipped cream. Just make sure it’s stabilized so it holds its shape. You can also use mascarpone cheese whipped with a bit of sugar for an even richer, tangier flavor.
How long does Dirt Cake last in the refrigerator?
Dirt cake recipe will stay fresh in the fridge for 3 to 4 days, when stored properly covered. The texture will be best in the first two days.
Can I use different types of cookies for the “dirt”?
Yes! While Oreos are classic, you can experiment. Chocolate graham crackers or even chocolate wafer cookies would work. Just make sure they are crisp cookies that can be easily crushed.
Is Dirt Cake gluten-free friendly?
Classic dirt cake recipe with Oreos is not gluten-free. However, you can easily make a gluten-free version by using gluten-free chocolate sandwich cookies, which are now widely available. Double-check that your pudding mixes and other ingredients are also certified gluten-free if needed.
More Fun and Easy Dessert Recipes You’ll Dig
If you love how easy and fun dirt cake recipe is, here are a few other dessert recipes you might enjoy:
Mango Mousse: A Tropical No-Bake Dessert for Summer
This Mango Mousse is a delightful no-bake recipe that delivers a burst of tropical flavor in every spoonful.
Easy Cinnamon Rolls from Scratch
Imagine biting into a warm, soft cloud, sweet and spicy all at once. That’s what homemade cinnamon rolls are like!
Baby Lemon Impossible Pie: Easy Crustless Recipe
This pie is a burst of sunshine in every bite, with a tangy lemon taste that’s just right.
Easy & Fun Dirt Cake Recipe: The Kid-Friendly Dessert That Gets Everyone Digging In!
Ingredients
For the “Dirt” Layer:
- 1 15-ounce package Oreo cookies
For the Pudding Layers:
- 1 8-ounce package cream cheese, softened
- 1 cup powdered sugar
- 3 cups cold milk
- 1 3.4-ounce package instant vanilla pudding mix
- 1 3.9-ounce package instant chocolate pudding mix
- 8 ounces whipped topping such as Cool Whip, thawed, divided
For Decoration:
- Gummy worms
- Chocolate rocks optional
- Sprinkles optional
Instructions
Get Started:
- Crush the Oreos: Place the whole package of Oreo cookies in a food processor and pulse until they are fine crumbs. Alternatively, place them in a zip-top bag and crush with a rolling pin. Set aside 1 cup of the crumbs for topping.
Make the Pudding Layers:
- Cream Cheese Mixture: In a large mixing bowl, beat the softened cream cheese and powdered sugar together with an electric mixer until smooth and creamy.
- Add Milk: Gradually whisk in the cold milk until well combined and smooth.
- Divide Mixture: Divide the cream cheese mixture evenly into two separate bowls.
- Vanilla Pudding Layer: To one bowl, add the vanilla pudding mix. Whisk until the pudding mix is well combined and begins to thicken. Gently fold in half (4 ounces) of the whipped topping until just combined. Set aside.
- Chocolate Pudding Layer: To the second bowl, add the chocolate pudding mix. Whisk until well combined and begins to thicken. Gently fold in the remaining half (4 ounces) of the whipped topping until just combined. Set aside.
Assemble the Dirt Cake:
- Oreo Base Layer: In a trifle bowl or large clear glass bowl, spread half of the crushed Oreo crumbs evenly across the bottom. Lightly press to create a base layer.
- Vanilla Pudding Layer: Gently spread the vanilla pudding mixture evenly over the Oreo crumb base.
- Middle Oreo Layer: Sprinkle another layer of Oreo crumbs over the vanilla pudding.
- Chocolate Pudding Layer: Spread the chocolate pudding mixture evenly over the Oreo crumb layer.
- Top Layer of “Dirt”: Sprinkle the remaining Oreo crumbs evenly over the chocolate pudding layer.
Chill and Decorate:
- Chill: Cover the dirt cake with plastic wrap and refrigerate for at least 4 hours, or preferably overnight, to allow the layers to set and flavors to meld.
- Decorate: Just before serving, decorate the top of the dirt cake with gummy worms, chocolate rocks, and sprinkles, if using. Arrange decorations to resemble worms in dirt.
Serve:
- Serve chilled, digging in with spoons to enjoy all the layers of this fun and tasty Dirt Cake!
Notes
- Make it Extra Chocolatey: For intense chocolate flavor, use chocolate flavored Oreo cookies and chocolate pudding mix. Consider adding a layer of chocolate ganache or mini chocolate chips between the pudding layers for an even richer experience.
- For a Lighter Version: To reduce calories and fat, use reduced-fat cream cheese, sugar-free pudding mixes, and light whipped topping. You can also substitute some of the whipped topping with plain Greek yogurt for added tang and protein.
- Get Creative with Decorations: Think beyond gummy worms and chocolate rocks! Use candy flowers, small toy shovels, or construction-themed candies to match party themes. For a fall theme, use candy pumpkins or fall leaves. For a birthday, add candles and sprinkles.
- Individual Serving Cups: Dirt Cake is perfect for individual servings! Assemble it in clear plastic cups, small mason jars, or even clean flower pots for a fun, themed presentation at parties. This makes serving and portion control easy.
- Make it Vegan: For a vegan Dirt Cake, use vegan Oreo cookies (many varieties are!), plant-based cream cheese alternative, and vegan whipped topping. Ensure your pudding mixes are also vegan-friendly (check ingredients for dairy-derived ingredients).
- Add a Crunchy Layer: For added texture, consider adding a layer of crushed pretzels or chopped nuts between the pudding layers for a salty-sweet crunch.
- Flavor Variations: Experiment with different pudding flavors! Butterscotch, pistachio, or even cheesecake flavored pudding can create interesting and tasty variations on the classic Dirt Cake.
- Boozy Adult Version (for adult parties only): Add a tablespoon or two of chocolate liqueur or coffee liqueur to the chocolate pudding layer for a sophisticated adult twist.
- Make it Ahead Expert Tip: While Dirt Cake is great made ahead, wait to add the gummy worms and decorations until just before serving to prevent them from becoming soggy from the moisture in the pudding. Store the decorations separately in an airtight container.
- Serving Suggestion: Serve Dirt Cake chilled. It’s delicious on its own, but you can also serve it with a dollop of extra whipped cream or a scoop of vanilla ice cream for an even more decadent treat.