Hello, breakfast adventurers!
Let’s talk about one of my absolute favorite kitchen superheroes: the humble yet mighty Egg muffin.
You might know them as egg bites, egg cups, or even fancy mini frittatas. Whatever you call them, these little wonders are a game-changer, especially for those mornings when time seems to evaporate faster than steam off hot coffee. As someone who lives and breathes recipes, I can tell you, having a stash of these ready to go feels like winning the breakfast lottery.
They are the cornerstone of easy breakfast planning and a fantastic vehicle for healthy eating without the fuss. Perfect for meal prep, these breakfast cups are designed for life on the move.

Table of Contents
Why Egg Muffins Totally Rock My Socks Off
Honestly, what’s not to love? They’re versatile, easy, and oh-so-satisfying. They’ve saved my mornings more times than I can count, transforming chaotic starts into surprisingly calm and nourished ones.
The Ultimate Grab-and-Go Breakfast Buddy
Picture this: your alarm blares, you hit snooze maybe one too many times, and suddenly you have minutes to get out the door. Instead of grabbing a sugary bar or skipping breakfast altogether (please don’t!), you open the fridge, pull out a couple of pre-made egg muffins, give them a quick warm-up, and boom – a proper portable breakfast is in your hand. This is the beauty of the make-ahead breakfast. These little guys are designed for the hustle, making them the perfect on-the-go breakfast. No forks required, just pure, handheld convenience. They fit perfectly into a meal prep breakfast routine, setting you up for success all week long.
Power Up Your Day the Delicious Way
I’m always looking for ways to start the day strong, and these deliver. We’re talking a serious high protein breakfast here, folks. That protein helps keep you feeling full and satisfied, dodging that mid-morning slump where you suddenly need all the snacks. It’s real energy, not the jittery kind you get from caffeine or sugar. Plus, you can load them up with veggies, sneaking in some goodness first thing. It’s a genuinely healthy breakfast choice that doesn’t taste like “health food,” if you know what I mean. They easily fit into various eating plans, supporting healthy eating goals without feeling restrictive.
So Easy, Even a Kid Can Make Them (Seriously!)
When I say easy breakfast, I mean it. And quick breakfast? Absolutely. The prep time is minimal – mostly just chopping and whisking. The oven does the heavy lifting. This is one of those recipes I love making with kids. They can help whisk the eggs, sprinkle in cheese, or divide the fillings among the muffin cups (with supervision, of course!). It gets them involved in the kitchen and excited about eating something they helped create. It’s a fantastic way to introduce gluten-free cooking naturally, as these are inherently free of gluten.
Gearing Up for Egg Muffin Success
Before we dive into the mixing and baking, let’s talk tools. You don’t need anything super fancy, but having the right gear makes the process smoother. Essential equipment is key!
The Mighty Muffin Tin: Your Muffin’s Home Base
First things first, you need a Muffin tin / Muffin pan. A standard 12-cup tin is perfect for most recipes, including the ones we’ll explore. Now, you have choices: traditional metal tins (non-stick is helpful) or silicone muffin pans. Metal tins often give slightly crispier edges, which some people love. Silicone pans, on the other hand, make popping the finished egg cups out incredibly easy. Both work well, so use what you have or prefer. Budget Bytes often highlights recipes working well in standard tins, emphasizing accessibility.
Liners or Go Bare? The Great Debate
To line or not to line? That is the question many user reviews tackle. Here’s the scoop: Do not use paper liners. I repeat, do not use paper! The egg mixture tends to seep into them and stick like crazy, leading to a frustrating peeling experience. Your best bets are either using Silicone liners, which are reusable and fantastically non-stick, or thoroughly greasing your muffin tin. And when I say grease, I mean grease. A generous coating of Nonstick spray is crucial, especially in metal pans. Make sure to get the sides and the bottom well. Some readers, particularly noted in Allrecipes comments, swear by using butter or solid coconut oil rubbed into the cups, finding it creates a better barrier than spray oil, a tip also echoed in a Downshiftology comment.
Whisks, Bowls, and Maybe a Blender?
You’ll need a large bowl for whisking the eggs and mixing your ingredients. A whisk is your best friend here for getting the eggs nice and incorporated. A large measuring cup with a spout, as recommended by Well Plated by Erin Clarke, is a clever idea because it makes pouring the egg mixture into the muffin tin cups much neater – less dribble! If you plan on trying the Budget Bytes method that uses cottage cheese for extra creaminess and protein, you’ll want a blender to get that mixture super smooth before adding other fillings.
The Basic Egg Muffin Blueprint: Let’s Get Cooking!
Alright, kitchen gear assembled? Let’s walk through the fundamental steps to creating these delightful egg bites. Think of this as your base camp before we venture into exciting flavor territories.
Cracking the Code: All About the Eggs
The heart and soul of our egg muffins are, unsurprisingly, the Eggs. Most standard recipes call for about 8-12 large eggs for a 12-cup muffin tin. You’ll whisk these together until the yolks and whites are just combined – don’t over-whisk, or they can get tough. Some recipes play with the ratio. For instance, Well Plated by Erin Clarke suggests a mix of 6 whole eggs and 4 egg whites for a higher protein content without sacrificing texture too much. Budget Bytes takes a different approach, blending 10 large eggs with 1/2 cup of cottage cheese for a super tender result. You can also add a splash of Milk (about 1/4 cup per dozen eggs, like in the Allrecipes or The Modern Proper versions) which adds a little moisture and tenderness. Whole milk offers the richest result.
Seasoning Secrets: Beyond Salt and Pepper
While Salt and Pepper are essential, don’t stop there! This is where you start building flavor. Many recipes, including the one from Allrecipes and NYT Cooking, call for Garlic powder and Onion powder. These add a lovely savory depth that complements the eggs and fillings beautifully. A pinch is usually enough – you can always adjust to your taste. Think about dried herbs too – basil, oregano, thyme, or Italian seasoning blend well, especially with veggie-heavy variations.
Baking Basics: Temperature and Time
Baking is where the magic happens. Preheat your oven – temperatures vary slightly across recipes, commonly ranging from 350°F (175°C) as seen on Allrecipes, Well Plated, and NYT Cooking, to 375°F (190°C) suggested by Budget Bytes, up to 400°F (200°C) mentioned by Life Made Sweeter. Higher temperatures cook faster but require closer watching to prevent overcooking. Baking time typically falls between 12 and 30 minutes. It depends heavily on your oven, the temperature, and how full your muffin cups are. Keep an eye on them! They should puff up and look set in the center. The classic toothpick test works well: insert a toothpick into the center of a muffin; if it comes out clean, they’re done. Avoid overbaking, as that’s the fast track to rubbery egg muffins. They will deflate a bit as they cool – this is totally normal, so don’t panic!
Flavor Adventures: Customizing Your Egg Cups Like a Pro
This is where the real fun begins! The basic egg mixture is a blank canvas for your culinary creativity. Ingredient Customization is the name of the game, making this a truly versatile recipe. Let’s explore some popular and exciting combinations inspired by top recipes and home cooks.
Classic Combos That Always Win
You can’t go wrong with the tried-and-true pairings. Bacon and Cheddar cheese is a superstar combo featured in recipes from Allrecipes, The Modern Proper, and NYT Cooking. Crispy, salty bacon bits mingling with sharp, melted cheddar? Yes, please! You can cook fresh bacon until crisp and crumble it, or use pre-cooked bacon pieces like Oscar Mayer® for convenience. Another favorite, highlighted by Well Plated by Erin Clarke, is Spinach and Feta cheese. The salty tang of feta with earthy spinach is divine. Then there’s Broccoli Cheddar, a comforting classic suggested by Budget Bytes and Downshiftology. And let’s not forget Ham and Cheese (Cheddar or Swiss work great), a simple yet satisfying option mentioned in Allrecipes user comments and Budget Bytes flavor ideas, often using deli ham or leftover cooked ham, sometimes paired with Jimmy Dean pre-cooked sausage crumbles.
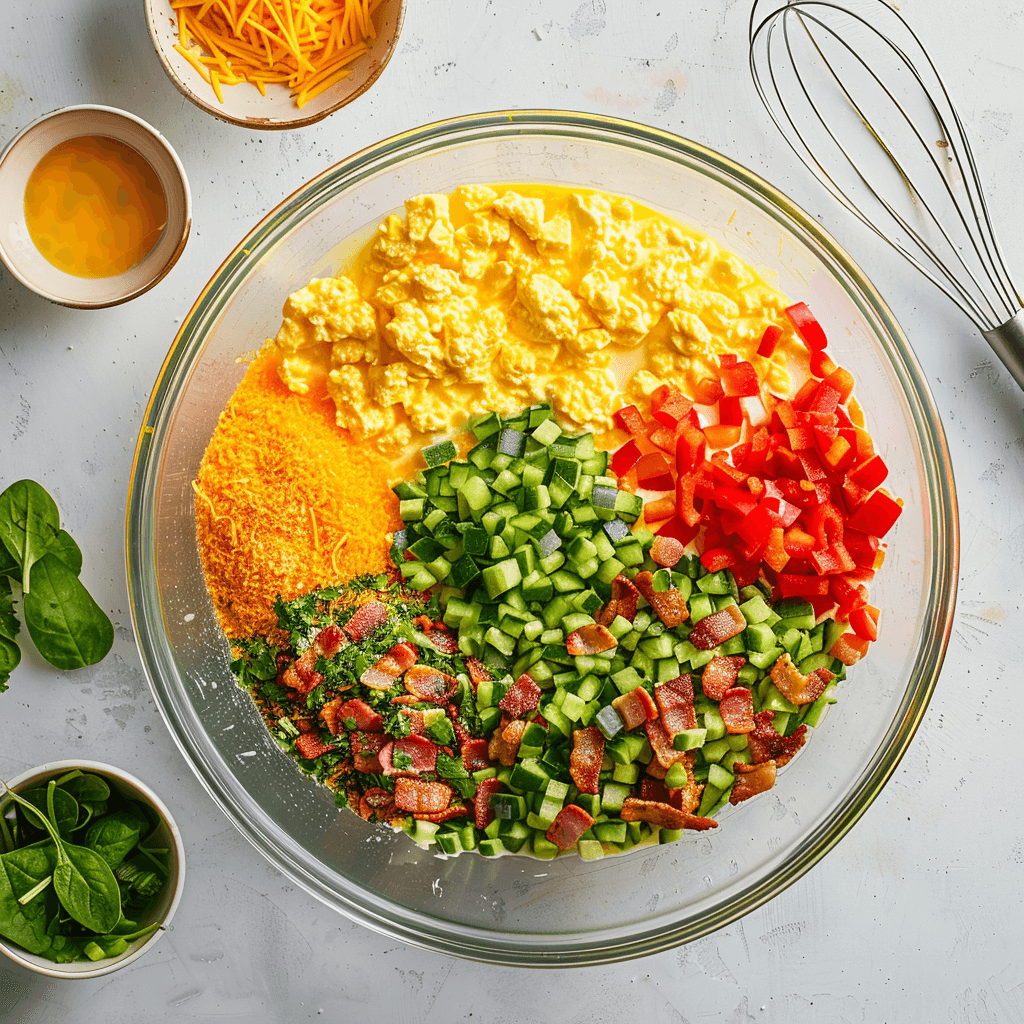
Veggie Delights: Packing in the Goodness
This is your chance to use up those veggies lurking in the fridge – a key aspect of Ingredient Sourcing for budget cooking. Finely chopped Bell peppers (red, green) add color and sweetness (Allrecipes, Well Plated). Sautéed Mushrooms bring an earthy depth (Life Made Sweeter bacon variation, Downshiftology comment). Halved Tomatoes (cherry, grape) burst with juicy flavor, while chopped sun-dried tomatoes offer a concentrated, chewy tang (Well Plated, Downshiftology, Life Made Sweeter). Wilting some Spinach or Kale adds nutrients and color (Budget Bytes, Downshiftology). Finely chopped Broccoli florets work wonderfully (Budget Bytes, Downshiftology). Sliced Green onions / Scallions provide a mild oniony bite (Allrecipes, NYT Cooking). Flavor pairing idea: sauté mushrooms and onions together before adding them. Texture tip: As Well Plated advises, if using veggies with high water content like spinach or mushrooms, it’s a good idea to quickly sauté them first to cook off some moisture, preventing watery egg muffins.
Cheesy Choices: From Mild to Bold
Cheese adds flavor, richness, and helps bind everything together. Cheddar cheese (mild or sharp) is a crowd-pleaser. Crumbled Feta cheese offers a salty, briny kick that pairs beautifully with spinach or tomatoes. Creamy Goat cheese adds a distinct tang, wonderful with herbs or sun-dried tomatoes (Budget Bytes, Downshiftology). Grated Parmesan cheese brings a nutty, savory element (Well Plated, Downshiftology, Life Made Sweeter). Feel free to mix and match! A combination of cheddar and parmesan, or feta and mozzarella, can be delicious.
Meat Lover’s Mix-Ins: Protein Power-Ups
For an extra protein boost or just because you love it, adding meat is easy. Crumbled cooked Sausage (Italian, breakfast) adds savory spice (Allrecipes comment, Budget Bytes, Downshiftology). Crispy Bacon is always a hit. Diced cooked Ham provides a classic breakfast flavor. Remember to pre-cook any raw meats before adding them to the egg mixture. Using leftovers like cooked chicken (Life Made Sweeter Buffalo Chicken variation) is another smart Ingredient Sourcing trick.
Spice It Up: Adding Zing and Zest
Don’t be afraid to introduce some heat or unique flavors. Chopped Jalapeños, seeded for less heat or left with seeds for more kick, add a lovely vibrancy (The Modern Proper, Life Made Sweeter). A dash of your favorite hot sauce whisked into the eggs works too. For a Korean twist inspired by Life Made Sweeter, try adding finely chopped Kimchi and a touch of toasted sesame oil. Fresh herbs like chopped cilantro, chives, parsley, or dried herbs like basil, oregano, or Italian seasoning (Life Made Sweeter Tomato Spinach variation) elevate the flavors significantly.
Dietary Adaptations: Egg Muffins for Every Eater
One of the best things about egg muffins is how adaptable they are to various dietary needs and preferences. Whether you’re keto, paleo, gluten-free, or feeding picky kids, there’s an egg muffin for you.
Keto & Low-Carb Champions: Fueling Your Goals
Egg muffins are practically tailor-made for Low-Carb / Keto Diets. Eggs, cheese, meats, and low-carb veggies are all staples. They provide healthy fats and protein with minimal carbs, making them an ideal Keto breakfast or Low carb breakfast. Keep track of your Macros by choosing fillings wisely – focus on leafy greens, non-starchy veggies like bell peppers or broccoli, cheese, and meats. The Nutrition Facts for a basic egg muffin are typically very low in carbs, often just 1-3g per muffin depending on fillings. Check specific recipes like those on Life Made Sweeter or Well Plated for detailed calories and macro breakdowns.
Paleo & Whole30 Power: Clean Eating Made Easy
Making these Paleo or Whole30 compliant is straightforward. Omit the cheese for a Dairy-free option (or use a compliant nut-based cheese if allowed on your specific plan). Ensure any added meats like bacon or sausage are free from added sugars, nitrates, and non-compliant ingredients – check labels carefully. Load up on compliant veggies like spinach, kale, mushrooms, bell peppers, and tomatoes. Recipes from Downshiftology and Life Made Sweeter often provide specific Paleo/Whole30 variations, like the Sun-Dried Tomato and Spinach or Buffalo Chicken options (using compliant sauce). They remain a fantastic high protein breakfast choice for these lifestyles.
Gluten-Free Goodness: Naturally Delicious
Good news for gluten-avoiders: Egg muffins are naturally gluten-free! Eggs, meats, veggies, and cheese don’t contain gluten. This makes them a worry-free choice for anyone practicing Gluten-Free Cooking or those with celiac disease or gluten sensitivity. Just be mindful of cross-contamination if preparing them in a kitchen where gluten is present, and double-check any processed ingredients like pre-cooked meats for hidden gluten. Enjoy your Gluten-free breakfast!
Kid-Friendly Fun: Winning Over Picky Eaters
Getting kids excited about breakfast can be a challenge, but egg muffins are often a hit. Their handheld size makes them fun to eat (Kid-Friendly Breakfasts). You can tailor the fillings to their preferences – simple Ham and Cheddar cheese, plain cheese, or mild veggies like finely chopped broccoli or corn. Child-friendly tip: Sometimes finely chopping or even grating veggies helps them “disappear” into the muffin, making them more acceptable to suspicious eaters. An Allrecipes user asked about omitting peppers and onions for picky kids, and the suggestion was to add more bacon, ham, or cheese, or try mild veggies like zucchini. Making them together can also increase their willingness to try them!
Meal Prep Masterclass: Your Future Self Will Thank You
The true magic of egg muffins shines when you embrace their meal prep potential. Cooking a batch on Sunday sets you up for effortless, healthy breakfasts all week long. This is Make-Ahead Breakfasts at its finest.
Cook Once, Eat Deliciously All Week
Imagine waking up knowing a satisfying meal prep breakfast is waiting. That’s the power of batch-cooking egg muffins. Spending 30-40 minutes prepping and baking yields up to a week’s worth of grab-and-go meals. It saves time, reduces morning stress, and helps you stick to your healthy eating goals by removing the temptation of less nutritious convenience foods. Many sources, including Well Plated, Budget Bytes, and Downshiftology, champion this make-ahead approach.
Storing Your Stash: Fridge Rules
Once your egg muffins have cooled completely (this is important to prevent condensation), Storing them is simple. Place them in an airtight container or a resealable bag. They’ll keep well in the refrigerator for about 3 to 5 days, according to most sources like Well Plated, Budget Bytes, and The Modern Proper. Stacking them with a small piece of parchment paper in between can prevent sticking if they’re tightly packed. This is a key part of the Storage and Reheating Instructions.
Freezer Friendly Magic: Long-Term Breakfast Insurance
Yes, you absolutely can freeze egg muffins! They are fantastic Freezer-Friendly Recipes. Allow them to cool completely first. The best method for Freezing, recommended by NYT Cooking comments and Well Plated, is to wrap each muffin individually in plastic wrap or foil, or flash-freeze them on a baking sheet until solid before transferring them to a freezer-safe bag or container. This prevents them from sticking together and makes it easy to grab just one or two. Properly stored Freezer friendly eggs like these can last for up to 3 months. What a great storage solution!
Reheating Right: Avoiding the Rubber Zone
Reheating is simple, but there’s a knack to keeping them tender. The microwave is fastest: place one or two muffins on a plate and heat on medium power for about 30-60 seconds (from thawed) or 1-2 minutes (from frozen), until warmed through. A reheating trick from Well Plated suggests wrapping the muffin in a barely damp paper towel before microwaving to help prevent it from drying out or getting rubbery. You can also reheat them in a toaster oven or conventional oven at around 350°F (175°C) for 5-10 minutes, or even an air fryer for a few minutes (Life Made Sweeter suggests 375°F for 3-5 mins). The key is gentle heat – avoid blasting them on high power.
Expert Tips & Tricks for Egg Muffin Perfection
Over many batches, you pick up little secrets. Here are some nuggets of wisdom, gleaned from experience and top recipe developers, to help you achieve egg muffin nirvana every time.
Avoiding the Dreaded Stick: Grease is Your Friend!
We touched on this, but it bears repeating because it’s the most common frustration mentioned in user reviews, especially on sites like Allrecipes. Generously grease your muffin tin / muffin pan with Nonstick spray or a solid fat like butter or coconut oil. Silicone liners are practically foolproof. If using a metal tin, even a non-stick one, don’t skimp on the grease! That extra moment spent ensuring every nook and cranny is coated will save you cleanup headaches later. A common mistake to avoid is assuming a ‘non-stick’ pan needs no help with eggs.
Texture Talk: Achieving Soft, Not Spongy, Bites
The ideal egg muffin is tender and moist, not rubbery or spongy. The biggest culprit for poor texture is overcooking. Pull them from the oven as soon as they are set. Remember they carry over heat and continue cooking slightly as they cool. Adding a bit of fat via milk, cheese, or even the cottage cheese trick from Budget Bytes helps create a softer texture. Blending the cottage cheese ensures a smooth consistency. Don’t worry if they puff up dramatically in the oven and then deflate upon cooling – that’s perfectly normal thermal expansion and contraction!
Ratio Rules: Finding the Sweet Spot
Getting the balance right between the egg mixture and your fillings is important. Too many fillings, especially watery ones, can make the muffins fall apart or taste more like a salad, as Well Plated notes. Aim for the fillings to take up about half to two-thirds of the muffin cup before pouring in the egg. For the egg base itself, Well Plated finds that a ratio of 6 whole eggs plus 4 egg whites yields a good balance of protein and tenderness for a 12-cup batch, though using all whole eggs (around 10-12) works perfectly well too.
Budget Bites: Savvy Savings and Using Leftovers
Egg muffins are inherently great for Budget Cooking. Eggs are a relatively inexpensive protein source. This customizable recipe shines when using up leftover cooked meats (ham, chicken, sausage) or small amounts of veggies (spinach, bell peppers, mushrooms) before they go bad – excellent Ingredient Sourcing! Budget Bytes even provides a Recipe Cost Calculation for their version, showing how affordable they can be. Making your own instead of buying pricey egg bites from cafes saves significant money.
Serving Suggestions & What the Community Says
Your delicious egg muffins are baked and ready! How should you serve them, and what are fellow home cooks saying about their own egg muffin adventures?
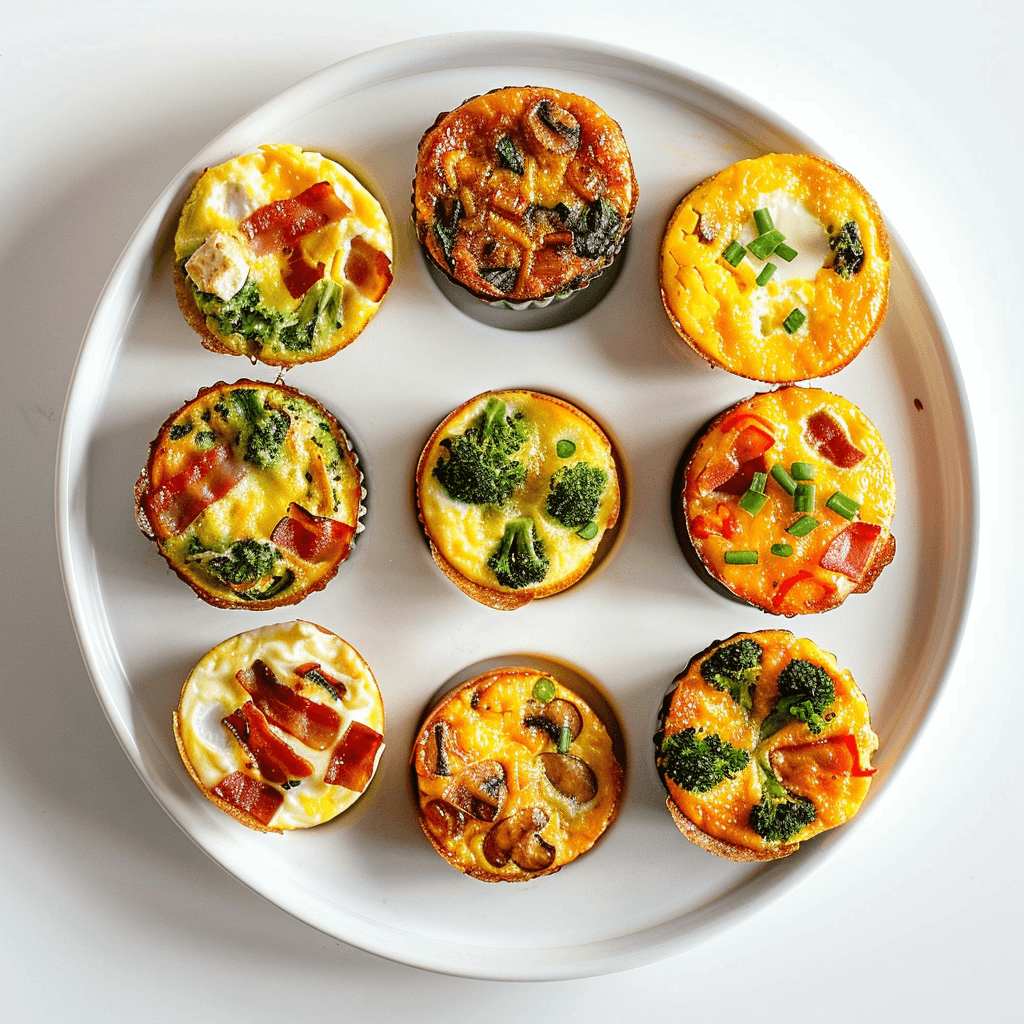
Top It Off! Delicious Serving Ideas
While fantastic on their own, a simple topping can elevate your egg muffins. Serving Suggestions abound: a dollop of salsa or pico de gallo, a smear of creamy avocado or guacamole, a drizzle of your favorite hot sauce, or a sprinkle of fresh herbs like cilantro or chives add freshness and flavor. Some enjoy them alongside a piece of fruit or toast for a more complete meal. A presentation idea: arrange different flavored muffins on a platter for a brunch gathering.
What the Crowd Says: Reviews and Q&A Insights
Diving into User Reviews and Community Q&A sections on sites like Allrecipes, Well Plated, Budget Bytes, and NYT Cooking reveals common themes. Many rave about the convenience for meal prep breakfast. Questions often revolve around freezing and reheating, preventing sticking (the eternal struggle!), substituting ingredients (like using egg whites or different cheeses like Goat cheese or Parmesan cheese), and making them kid-friendly. Success stories often highlight specific flavor combos people loved, like Bacon–Mushroom–Spinach or Jalapeño Popper (Life Made Sweeter).
Step-by-Step to Your Perfect Egg Muffins
Let’s walk through making a classic batch, perhaps the Bacon, Cheddar, and Green Onion version, step-by-step.
Prep Your Power Fillings
First, get your add-ins ready. If using fresh Bacon, cook it until crispy, let it cool slightly, then crumble or chop it. If using veggies like Bell peppers (red, green) or Mushrooms, chop them finely. Slice your Green onions / Scallions. Shred your Cheddar cheese (pre-shredded is fine, but freshly shredded melts beautifully). Having everything prepped makes assembly a breeze.
Mix, Pour, and Fill ‘Er Up!
Crack your Eggs into a large bowl (let’s say 10 large eggs). Add about 1/4 cup of Milk, 1/2 teaspoon Salt, 1/4 teaspoon Pepper, and maybe a pinch of Garlic powder and Onion powder. Whisk everything together until just combined. Now, evenly distribute about half of your fillings (bacon, cheese, green onions) among the greased Muffin tin / Muffin pan cups. Carefully pour the egg mixture over the fillings, filling each cup about two-thirds to three-quarters full. Sprinkle the remaining fillings over the top.
Bake to Golden Perfection
Place your filled muffin tin into your preheated oven (let’s use 350°F/175°C). Let the Baking magic happen for about 20-25 minutes. Keep an eye on them – they should puff up and the centers should look set, not jiggly or wet. A toothpick inserted should come out clean. The edges might be lightly golden.
Cool Down and Enjoy the Rewards
Once baked, carefully remove the muffin tin from the oven. Let the egg muffins cool in the tin for at least 5-10 minutes. This helps them firm up and makes them easier to remove. Run a thin spatula or butter knife around the edges of each muffin to loosen it, then gently lift them out. Place them on a wire rack to cool completely if you’re planning on Storing them, or enjoy them warm right away!

Fluffy Egg Muffins for Busy Days
Ingredients
- 10–12 large eggs
- ¼ cup whole milk optional, for tenderness
- ½ teaspoon salt
- ¼ teaspoon black pepper
- 1 pinch garlic powder optional
- 1 pinch onion powder optional
- Nonstick cooking spray or butter/oil for greasing
- 1.5 – 2 cup total combined fillings e.g., cooked crumbled bacon, shredded cheddar cheese, chopped green onions, chopped spinach, diced bell peppers, cooked sausage, feta cheese, etc.
Instructions
Preheat & Prep:
- Preheat oven to 350°F (175°C). Generously grease a 12-cup muffin tin or use silicone liners.
Prepare Fillings:
- Cook any raw meats (like bacon or sausage). Crumble or chop. Finely chop vegetables and shred cheese.
Whisk Eggs:
- In a large bowl or measuring cup with a spout, whisk together the eggs, milk (if using), salt, pepper, garlic powder, and onion powder. Mix just until combined.
Assemble Muffins:
- Divide half the fillings into the muffin cups. Pour egg mixture over, filling each ⅔ to ¾ full. Sprinkle remaining fillings on top.
Bake:
- Bake for 20–25 minutes, until muffins are puffed, centers are set, and a toothpick comes out clean.
Cool & Serve:
- Let muffins cool in the pan for 5–10 minutes. Run a knife around edges to loosen. Serve warm or let cool completely on a rack for storage.
Notes
- Sticking Solutions: This is the #1 frustration I hear about! Please, please grease your muffin tin / muffin pan generously. Use nonstick spray, melted butter, or coconut oil, getting into every corner. My personal favorite for guaranteed release? Silicone liners. They are reusable and make cleanup a breeze. Avoid paper liners at all costs – the eggs will weld themselves to the paper!
- Texture Perfection: Don’t overbake! This is the key to avoiding rubbery egg bites. Pull them out as soon as the centers are just set (a toothpick should come out clean). They will deflate as they cool; this is totally normal science happening, not a sign you did something wrong. For softer, creamier muffins, try the Budget Bytes trick of blending in a little cottage cheese with the eggs. If using watery veggies like fresh spinach or mushrooms, give them a quick sauté first to cook off excess moisture, preventing soggy bottoms.
- Egg Variations: While most recipes call for large whole eggs, feel free to experiment. You can use all whole eggs (around 10-12 for a standard 12-cup tin), try the Well Plated mix of whole eggs and egg whites for a slightly leaner high protein breakfast, or substitute liquid egg whites or egg beaters (the texture might be slightly different).
- Milk Matters (or Doesn’t): Adding a splash of milk (whole milk gives the richest results, but low-fat or dairy-free alternatives like unsweetened almond milk work too) adds a bit of moisture. You can also omit it entirely if you prefer.
- Cheese Choices: Go wild! Cheddar cheese, Feta cheese, Goat cheese, Parmesan cheese, Swiss, Monterey Jack – they all work beautifully. For Paleo/Whole30/Dairy-free options, simply omit the cheese or use a compliant nut-based alternative if you like.
- Filling Frenzy: This customizable recipe is perfect for Ingredient Sourcing from your fridge! Use leftover cooked meats like bacon, ham, or sausage (Italian, breakfast). Chop up any veggies needing homes – bell peppers (red, green), broccoli, kale, tomatoes (cherry, grape, sun-dried). Just ensure everything is chopped relatively small and pre-cooked if necessary (like raw meats).
- Storage Smarts: Let your egg muffins cool completely on a wire rack before Storing. This prevents condensation inside your container. Keep them in an airtight container in the fridge for 3-5 days.
- Freezer Power: These are fantastic freezer friendly eggs! For best results (Freezing tip from NYT Cooking comments and Well Plated), wrap cooled muffins individually in plastic wrap or foil, OR flash-freeze them on a baking sheet before transferring to a freezer bag. This prevents sticking and makes grabbing individuals easy. They last up to 3 months.
- Reheating Right: Gentle heat is key for Reheating. Microwave on medium power (try the damp paper towel trick from Well Plated to keep them moist), warm them in a toaster oven or regular oven (around 350°F/175°C), or pop them in an air fryer for a few minutes. Avoid high heat which can make them rubbery.
- Meal Prep Champion: Embrace the make-ahead breakfast aspect! Bake a batch on Sunday for effortless portable breakfast options all week. Your future self will definitely appreciate this meal prep breakfast strategy.